Straw Bale Gardening
Ordinarily, raised beds filled with fertile, fresh-smelling soil are the gold standard for growing edibles. You can blend the soil to well-draining organic perfection, work in more organic material every time you put in a new crop, plant intensively and control weeds. Also, because the beds are raised, they’re easier to reach.
But depending on your situation, raised beds may not be practical. Say your only sunny spot is a paved courtyard, you’re new to edibles and not ready to commit to the cost of building raised beds, or you’re renting and don’t want to invest in your landlord’s improvements.
Instead, straw bales are an option. They’re inexpensive, temporary and—from my recent testing—provide a welcoming environment for seasonal edibles.
Getting Started
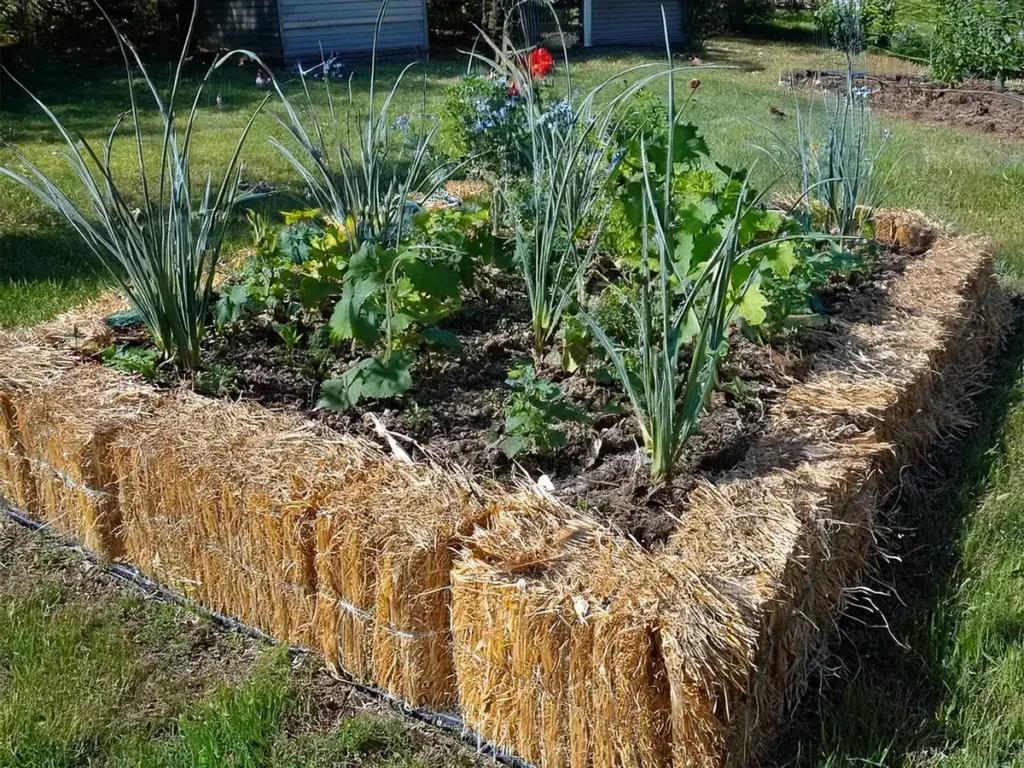
Be sure to buy bales of straw, which should not harbor as many weed seeds as bales of alfalfa or hay. I bought two, measuring 43 inches long, 14 inches wide and 20 inches tall, for $30 from La Cumbre Feed in Santa Barbara.
Set the bales so the baling twine is parallel to the ground and the stalks face up. The stalks are hollow and act like straws, “drinking” the irrigation into the interiors of the bales. I butted mine together to create a 28-inch-wide growing space.
Next comes conditioning, a process that takes four to six weeks. You’ll saturate the straw, then add a balanced fertilizer to activate the decomposition of the carbon-rich stalks, which should create a pliable, nutrient-filled growing medium. It’s akin to setting up a mini compost system, with the fertilizer providing the nitrogen and the straw providing the carbon.
Week One, I soaked my bales daily. I applied the water slowly to prevent it from skittering off the tops. The bales consumed an alarming amount of water—easily 15 to 20 gallons per soak.
Week Two called for daily watering, along with a half cup of fertilizer, per bale, for the first three days, then a quarter cup the following three days. By Week Three, the bales were to heat up, indicating that decomposition had begun.
Day One of Week Two (a Sunday), I applied two balanced fertilizers that I had on hand. Onto one bale went a 5-6-6 all-purpose organic plant food containing feather, bone, blood, kelp and alfalfa meal; sulfate of potash and 12 strains of mycorrhizae. Onto the other bale, I sprinkled a straightforward 10-12-10 rose food derived from polymer and sulfur-coated urea, ammonium sulfate, ammonium phosphate, muriate of potash, ferrous sulfate and ferric oxide.
Monday, the granules were still intact, so I watered only. Tuesday, I applied a half-cup to each bale and watered. Wednesday, Thursday and Friday came and went with the granules still visible, so water only.
Saturday, half a dozen grass-like blades sprouted and heralded the appearance of an earwig, narrow brown beetle, honeybee and greenish-black fly.
But no heat. I applied one last half-cup to each bale, then opted to forgo further applications, fearing that the roots of tender new seedlings might burn, once they went in.
Weeks Three through Five, I continued drenching the bales every few days, and continued to be concerned about how much water disappeared into them.
Week Six, still no heat. But the interiors had begun to soften when I probed by hand, so I finally planted.
Planting Time
Understand that you won’t be planting directly in the straw. Instead, you’ll create individual planting holes (I used clippers to carve out holes about 6 inches wide and 10 inches deep), then fill them with high-quality potting soil and compost. Keep those holes toward the center. Too close to the edges and the sides of the bale may collapse.
Likewise, sowing seeds is difficult as there’s not much surface area. Also, in my case, I wanted to test a variety of vegetables rather than sow a single crop.
I chose smaller-scale plants, from four-inch pots. A Sweet Banana heirloom pepper, Ancho Gigantea pepper and Early Girl tomato went into one bale; a Kentucky Wonder bush bean, Japanese Millionaire heirloom eggplant and Green Zebra heirloom tomato into the other. I planted duplicates in a nearby raised bed for comparison.
Both sets grew at about the same pace. However, the straw bale vegetables required more frequent water, and hand-watering had to be reduced to a trickle. I had inserted each plant into a shallow depression, shaped extra potting soil to create mini-basins, then mulched the entire straw top with another inch of potting soil and fine compost. But if the hose water came out too fast, it overflowed the basins, sheeted off the mulch and cascaded onto the surrounding dirt.
Once the seedlings’ leaves grew large enough to fully shade the bales, I was able to reduce the watering to match that of the veggies in the raised bed.
The Verdict
For most gardeners, despite any hiccups along the way, the quality of the crop is the ultimate measure of success.
By that bar, my straw bales delivered. The plants were just as tall and robust as those in the raised bed. Neither set suffered from pests or disease. More important, they yielded equally impressive harvests of tasty, succulent tomatoes, peppers, beans and eggplants.
In the plus column, then, my straw bales produced terrific crops. At 20 inches tall, the bales were easier to maintain than my foot-tall raised beds. They didn’t cost much. And I could compost the remains.
However, that extra water was troubling, especially since irrigation began six weeks before planting. In retrospect, I could have tried covering the bales with a tarp to conserve water during the conditioning phase, perhaps generating that elusive heat as well.
Would I garden in straw bales again? It’s unlikely, given that, at four acres, we have an embarrassment of growing space. But if traditional raised beds weren’t practical, I would give straw bales serious thought, as I found that they are an effective alternative for producing home-grown, healthy edibles.